

How To Migrate From Windows Server 2003 To 2012
In-Depth
Migrating Windows Server 2003 Active Directory Domains
Migrating from Windows Server 2003 requires organizations to decommission existing Global Catalogs and domain controllers to conform with Agile Directory schema in newer versions of the server OS.
Of the many remediation efforts Information technology organizations must undergo when migrating off Windows Server 2003, the decommissioning of antiquated Agile Directory domain controllers to implement the more robust Active Directory functionality in Windows Server 2012 R2 is a top priority. It's not optional and, in add-on to application- and hardware-compatibility problems, is a key reason many organizations have put off sunsetting their Windows Server 2003-based systems, even though Microsoft has fabricated clear for years that it'll no longer support information technology afterwards July 14, 2015.
Only migrating your Windows Server 2003 Active Directory DCs to Windows Server 2012 R2 -- the virtually recent and, hence, recommended target platform to supervene upon the decommissioned servers -- doesn't have to be a showstopper. This pace-by-pace, click-by-click process through a test surround's Advertisement schema volition demonstrate how to upgrade your AD schema, heighten the woods functional level to get a Windows Server 2012 R2 Global Catalog (GC) DC upwards and running. It will too explain how to take the necessary step of decommissioning existing Windows Server 2003 GCs and DCs.
For this article, the test surroundings consists of a single forest, a single domain AD with a single Windows Server 2003-based DC. Therefore, this DC is too the Advert GC and holds all five Flexible Unmarried Primary Operations (FSMO) roles. In addition, the server acts every bit the internal DNS server for the AD domain. The AD forest functional level is Windows Server 2003. Although this functionality list might seem daunting, with a bit of planning and a methodical approach, migrating all of these functions is a straightforward process.
Raise and Verify Advertising Forest Functional Levels
Pro Tip No. 1: If your organization'southward AD wood and/or domain functional level is still Windows 2000, information technology must be raised before going any further. Installing a Windows Server 2012 R2 DC into an existing domain requires the forest and domain functional level to exist Windows Server 2003 or college.
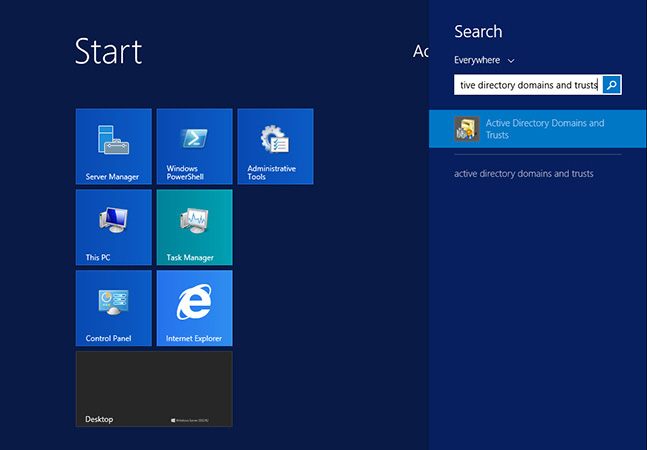
Verify the functional level of the domain past logging into the Windows Server 2003 DC with a domain admin-level account. Click Offset, aggrandize Administrative Tools and then click Agile Directory Domains and Trusts. In Advert Domains and Trusts, right-click the domain name then select Enhance Domain Functional Level. If it shows anything less than Windows Server 2003 as the current domain functional level, drop downwards the list box for available functional levels. Select Windows Server 2003, then click the Raise button. Click OK when prompted and and so yous've raised the functional level. No reboot of the server should be required, only if multiple DCs exist, allow ample time for the changes to replicate throughout the domain. Replication fourth dimension required could vary from 15 minutes to four hours or more, depending on your item network blueprint.
Verifying the functional level of the forest is done in much the aforementioned way. Log into the Windows Server 2003 DC with a domain admin-level account. Click Get-go, expand Authoritative Tools and and then click Active Directory Domains and Trusts. In AD Domains and Trusts, on the left side of the screen, correct-click Active Directory Domains and Trusts. Note that this isn't the domain name every bit used in the previous step. After right-clicking Active Directory Domains and Trusts, a context-sensitive menu appears. Select Raise Forest Functional Level. Again, if the current forest functional level list box displays annihilation before than Windows Server 2003, select Windows Server 2003, so click the Raise push button. Click OK to confirm understanding that the alter is permanent and affects the entire AD forest. Click OK when prompted that raising the forest functional level completed successfully. Merely as when raising the domain functional level, no reboot of the server should be required. As ever when making domain compages changes, if multiple DCs exist, allow ample fourth dimension for the changes to replicate throughout the domain. Call up, replication time required could vary from 15 minutes to four hours or more than, depending on your particular network design.
Stride i: Prepare a Windows Server 2012 R2 Server
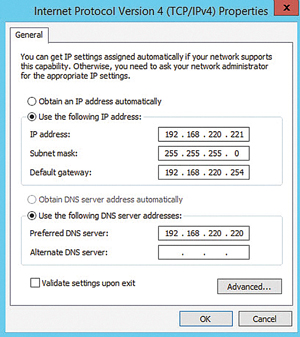
Begin with the basics. Fix up Windows Server 2012 R2 on a new host, either concrete or virtual. Subsequently installation, ready a static IP and configure the subnet mask, gateway and DNS server settings consistent with the network (see Effigy 1). Install any available disquisitional and recommended Windows Updates. As a final step, join the new server to the existing Advertisement domain. A basic Windows Server 2012 R2 member server is now upward and running!
Step 2: Add the Advertizement DS Role on the New Server
To gear up up your target, log on to the Windows Server 2012 R2 server using an business relationship with domain admin permissions. Open Server Director. By default, the Dashboard view will brandish. Under Configure this local server click Add roles and features. The Add Roles and Features Wizard will open. Click Next. Click the radio button for Part-based or feature-based installation. Click Side by side.
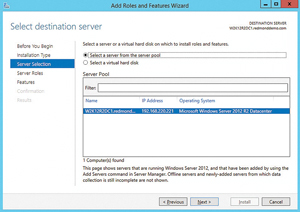
Click the radio button for Select a server from the server puddle. In the list of displayed servers, verify the current server is highlighted (see Figure 2). Click Side by side.
From the list of displayed roles, find and click the checkbox for Active Directory Domain Services. This will popular up a dialog asking to Add features required by Agile Directory Domain Services. Click the checkbox to Include management tools (if applicative). Click the Add together Features push to continue.
From the list of displayed roles, verify the Active Directory Domain Services checkbox is notwithstanding selected. Notice and click the checkbox for DNS Server. Click Side by side.
Detect in the Features listing some options are already selected. Some of these correspond previously installed features while others were selected when the Add features required past Active Directory Domain Services pick was chosen earlier. Click Side by side.
The next footstep of the wizard displays a bit of groundwork information regarding Agile Directory Domain Services. Cipher mind-blowing or mind-extraordinary is presented here. Click Side by side. Another informational page explains DNS and its integration with Advertizing. Click Next.
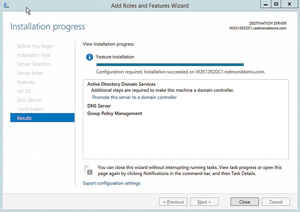
The concluding page of the Add Roles and Features Wizard displays a summary of the options selected for configuration. Click Install and spotter the wizard piece of work its magic! The sorcerer volition confirm installation was successful while reminding you lot that additional steps are necessary to promote this server to DC functionality. Click the link to Promote this server to a domain controller (run across Figure iii). The Active Directory Domain Services Configuration Wizard opens.
Step three: Promote the Windows Server 2012 R2 Server to a DC
On the initial page of the Agile Directory Domain Services Configuration Sorcerer, select the radio button for Add a domain controller to an existing domain. Considering this server is already a member of the domain, and is logged in using an business relationship with domain admin-level privileges, the wizard will automatically populate the Domain and Credential information. Ostend everything, then click Next to continue.
Pro Tip No. ii: A warning appears that "A domain controller running Windows 2008 or later could non be located in this domain..." This warning applies to read-merely DC (RODC) installation. Considering you're not installing an RODC the warning tin can, and should, exist ignored.
The next screen appears with the site proper noun selected and both DNS Server and GC options already checked. If for some reason this isn't the case, select the advisable site from the dropdown listing and click the checkboxes beside the DNS Server and GC options.
Think up a secure Directory Services Restore Style password. Mix upper-case letter and lowercase letters, numbers, and special characters. Type it in both the Countersign and Confirm password boxes. Effort and cheat the organization with a simple countersign and an mistake will appear. Click Side by side.
On the next screen, ignore the alarm "A delegation for this DNS server cannot be created because the authoritative parent zone cannot be establish..." Click Side by side.
Click Side by side on the Boosted Options, Paths and Preparation Options screens. No changes are required.
On the Review Options screen, verify all the before selections. Interested in the Windows PowerShell commands that volition run behind the scenes completing the DC promotion? Click the View Script button. Notepad opens displaying the necessary cmdlets, complete with customized parameters. The entire process is completed using simply 2 cmdlets.
Click Next. A Prerequisite cheque runs, ultimately displaying warnings about the DNS delegation error encountered earlier and a annotation about security setting defaults in Windows Server 2012 R2. These bug won't preclude completing promoting the server to a DC. Scroll downwards the results window and a green checkmark is displayed next to: All prerequisite checks passed successfully. Click "Install" to begin installation. This information is also displayed at the peak of the window and is the all clear to proceed. Note, the server will automatically reboot after promotion to a DC. Click the Install push to kick things off.
The bodily promotion procedure takes a few minutes. There's a lot to be done! The entire Advertising schema is being upgraded. The saying "patience is a virtue" comes to mind. In one case the server reboots on its own, log on with a domain admin-level business relationship. Congratulations! A new Windows Server 2012 R2 DC and DNS server is now up and running!
Stride 4: Transfer the FSMO Roles
Transferring the five Flexible Single Chief Performance (FSMO) roles isn't every bit difficult every bit it might seem. In fact, simply decommissioning the existing Windows Server 2003 DC will automatically transfer the FSMO roles. While automated is bonny, manually transferring the roles isn't hard and has the added benefit of granular control.
To transfer the Relative ID (RID) Chief, PDC Emulator and Infrastructure Master Roles, log on to the newly minted Windows Server 2012 R2 DC using an account with domain admin-level privileges. On the Get-go screen begin typing Agile Directory Users and Computers. The Search Charm opens. Click Agile Directory Users and Computers from the results list. The AD Users and Computers app opens on the desktop. Correct-click the domain name in the left pane, then select Operations Masters from the context-sensitive menu. The Operations Masters window appears, displaying three tabs; RID, PDC and Infrastructure. Each tab displays the current operations master for that role. The current server is also displayed along with a change button enabling the transfer of each role.
Source: https://redmondmag.com/articles/2015/03/01/active-directory-domains.aspx
Posted by: corninglosin1968.blogspot.com
0 Response to "How To Migrate From Windows Server 2003 To 2012"
Post a Comment